| |
PhotoSpills Custom Frames
Custom frames let you create unique frames similar to sport trading
cards.
This can add extra interest to your photos... or you can create and
print your own baseball, soccer, football or basketball cards.
To create a custom frame, select Frames -> New custom
frame from the main menu.
You will be shown the Custom Frames window.

Controls for building the frame are found on the left side of this
window.
A preview sample of your frame will be displayed on the right.
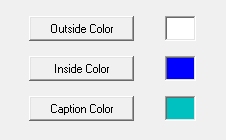 The top set of options control the colors for your frame.
Note the three colored boxes by the buttons.
Take note how these three colors are used in the sample.
Click on each of the three buttons here to pick the colors you want in
the frame.
The sample on the right will refresh with your choices.
The next set of controls the font and default caption
for your frame captions.
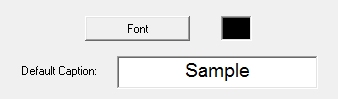
Click on the Font button to select a font.
You can use any font on your computer, but PhotoSpills will
determine the best size based on the length of your captions.
Now, click on the colored box next to the Font button.
This lets you set the color of the font.
Again, your changes will be reflected in the sample frame on the right.
The Default Caption field holds a caption that will be
used when no other caption is specified for your photos.
Type a generic name or phrase here suitable for your theme.
If you want, you can enter specific captions for each of your photos
a bit later.
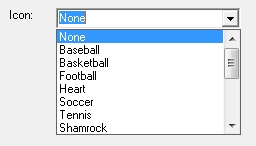 The Icon setting lets you choose an icon to put onto
the lower left corner of your frame.
The Icon setting lets you choose an icon to put onto
the lower left corner of your frame.
Click on the dropdown arrow and pick an icon from the list.
The selected icon will be drawn on the sample.
You can create your own icons (with another application) and add it into
your icon list here.
The bottom set of controls is for adding a special caption for each of
the photos you intend to use with your new custom frame.
Use this to add a person's name to the card or to include a
caption.

Click on the Photo list drop down arrow to select from
the lists you have created.
Note that you must have created the photo list prior to creating this
custom frame.
Then, click on the Add Captions button.
Another window will pop up similar to this:
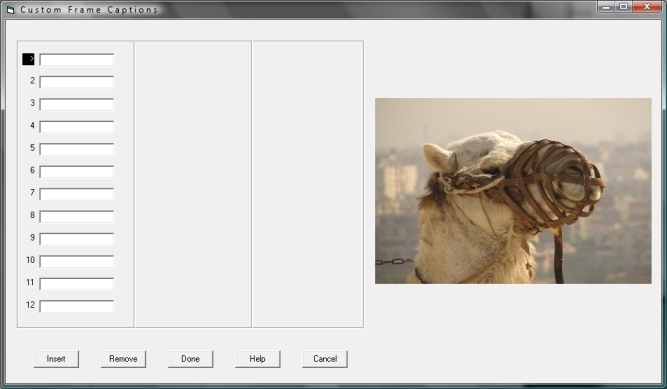
You will see the first photo in your list displayed on the right.
Text entry boxes will be listed on the left.
There will be one text box for each photo in your list and the first
one should be ready for your input.
Enter a caption for your first photo and hit the Return or
Tab key to advance to thenext photo.
The photo on the right will advance as you enter the captions.
When finished entering csaptions, click on the Done
button.
When you use this custom frame later, the identified photo list will
automatically be selected for you.
Note: When building a poster with captions for a photo list,
you should make sure your photos are used in the proper sequence.
In the Finishing touches screen, you should always use
Match and never use Random. options when
selecting photos.
Mixing those options will cause captions to be used with the wrong photos.
Adding captions without using a photo list
You can add captions without picking a photo list.
To do this, just leave the Photo List set to
None before clicking on Add Captions.
Your caption entry window will appear without a photo on the right and
you can enter up to 36 captions.
These captions will be applied to any set of photos you use for a
collage.
The Remove button can be used to delete a caption
from the list.&nsbsp;
Higher numbered captions will move up to a lower number and an enpty
caption box will be added as number 36.
The Insert button adds an empty caption box above the
current spot.
The current and lower numbered boxes will move down... adding one to the
location number.
If text box 36 contains an entry, you will need to clear it.
PhotoSpills will not push a caption out of your list.
You can remove any empty box to move captions up and, thus, clear
the last one.
|
|