| |
|
|
|
|
|
|
|
|
|
|
|---|
| |
PhotoSpills Matrix
A matrix collage is a grid of photos displayed in rows and columns.
You get to pick the number of rows and columns, the space around and
between the photos and the orientation of the photos.

To get started, select Matrix spill
from the main menu.
This will bring up a new panel with control settings on the left and
a preview image on the right that shows how the photos will be displayed.
|
|
| |
 The top two control frames are displayed here.
The Poster Orientation setting indicates how you want
the whole poster to be shaped.
The top two control frames are displayed here.
The Poster Orientation setting indicates how you want
the whole poster to be shaped.
The Photo Orientation setting determines how your
photos will be displayed in the matrix.
Your photos can be all landscape, all portrait, or a combination of
the two.
When using Both each landscape will be used in place of two
portraits.
Click on each of these settings to see how it changes the preview panel
on the right.
|
|
| |
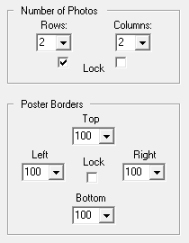 The next two control frames are displayed here.
The Number of Photos setting determines the
number of rows and columns for your photographs.
If either of the Lock boxes are checked, changing
the count on that side will automatically change the other side.
This is an easy way to keep photo height and width within acceptable
ratios.
When neither box is checked, you will need to manually change both rows
and columns.
The next two control frames are displayed here.
The Number of Photos setting determines the
number of rows and columns for your photographs.
If either of the Lock boxes are checked, changing
the count on that side will automatically change the other side.
This is an easy way to keep photo height and width within acceptable
ratios.
When neither box is checked, you will need to manually change both rows
and columns.
The Poster Borders settings is used to define the
space around the outside of the poster.
If the Lock box is checked, the change to any one
setting will be duplicated in the other three.
Again, make some changes to these settings to see how the preview image
is changed.
|
|
| |
The bottom three control frames are displayed below.
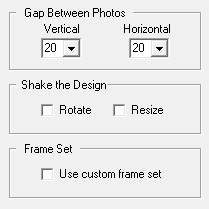
The Gap Between Photos controls set the border width
between your photos.
Changes here can force changes to the Number of Photos
frame above.
Change the gap sizes to see how the preview image is changed.
The Shake the Design controls can be used to change the
size and positioning of your photos.
- Checking the Rotate box causes each photo to be
randomly turned.
- Checking the Resize box will randomly alter the size
of each photo.
These settings will provide a less rigid design than a normal row by column
layout.
The Frame Set control lets you put each of your photos in
a custom frame
When you click on this, you will be asked to choose the frame set you want
to use.
Specifying a custom frame will not effect the preview window.
When done defining your matrix, click on the Ok
button.
You will then be shown the Finishing touches window to
customize and generate your collage.
|
|
| |
|
|
|
|
|
|
|
|
|
|